| Home | Newsletter | Locations | Diary |
|
Indexes |
|
|
|
|
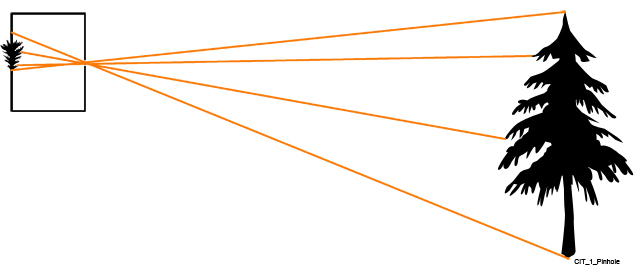
Article Introduction to DSLR PhotographyPhotography has changed very little from the point the first photo was taken through to today, while the cameras may look different and the technology has changed, the basic principles and many of the techniques and features have changed very little. Much of the basics goes back many centuries before this to the camera obscurer, a box a painter sat within drawing or painting the image produced by a pinhole. So in looking at photography with the latest DSLR (Digital Single Lens Reflex camera), lets start in the distant past, looking at how the camera obscurer works. The principle fact, that unless you do something to it, light travels in straight lines, meant that if you had a small hole then all light would, and could only reach one point, and as this was relative to its position in front of the box, the result was an image within the box. This image is back to front and upside down.
The size of the image was dependent on how far the wall or card the images were projected onto was away from the pinhole. With a longer distance the images were larger and as the same amount of light was spread over this, it was dimmer. The effect is very similar to changing the focal length of the lens, so we have a pinhole that is wide angle or telephoto in effect.
Today we can still use a pinhole instead of
our lens, and we have a special section on
Pinhole
Moving on from pinhole camera obscurers to the early camera, involved the need to control the amount of light to make the exposure, the variables being time, size of hole and sensitivity, and to allow more light, so exposure lengths can be shorter, it was necessary to use a lens. Adding a lens, allows far more light to enter, and its function is to focus the light so that all the light from a point still falls on a single point in the image, as it did with the pinhole. If you have used a magnifying glass and focused the sun onto a single point you will have seen this done, and the resulting heat that this produced. A lot of fires are started by parts of bottles and similar acting in a similar way when discarded. To focus the lens you move it backwards and forwards, and the larger the lens the more precise you need to focus it. If you add an aperture or some other means
of controlling the size of the hole then, as we move towards the pinhole we
get more in focus at the same time, and away from it less in focus at the
same time, the amount in focus is referred to as the depth of field. Managing
this effect is an essential part of photography. You can find out more
on this in
Depth of Field DOF
Explained The most frequent problems photographers encounter are around depth of field, and its often not understanding or being in command of this that has led some to believe that digital photography is inferior to film, when in fact the opposite applies.
Exposure,
Later, you may need, on occasions, a
different exposure on one part of the scene, you can achieve this using
graduated filters (grads), these are like sunglasses that taper out in
effect, this is covered
in Filters-ND graduated filters. The light we get from the sun
changes according to the time of day, being warmer, more orange early
morning and late evening and cooler, more blue at midday, the colour of the
light also changes between direct sunlight, overcast skies, or in
shade. When we come indoors the change in the colour of the light can be
even greater, with most flashbulbs giving out a very yellow light, and
fluorescent tubes and other light sources having other casts. You are so
used to this happening that your brain usually cancels out the effect, so
that you don't notice that people turn orange when coming indoors. We
do notice however when these effects show up in photographs. Managing this
colour difference in the light we know as white balance, and we can
allow the camera to make a fairly good attempt to mange this for us or we
can manage it ourselves fully. In practice most of us use auto white balance
alot and switch to using other means when the situation is critical, when we are
producing special work or where we know the camera will not do such a good
job. In the articles that are available from the introduction
so
what is white balance and why won’t auto white balance do,
Mastering the major items above, focus and
depth of field, the components of exposure, and white balance, will allow you
to get technically good photos, you can expand these capabilities by using
filters, see the
Filters
Moving on from technical to artistic, we need
to consider the
Composition
Editing is also a feature of photography, not to cure poor photography, but as a part of the process, allowing you to think of the shooting and editing as steps towards the image that you want. You might for example shoot an image quite dark, knowing you can pull detail out of the shadows and not loose the highlights, or you might shoot a series of photographs that are to be stitched together to form a panorama.
Within the
Topic Index,
To start with most people find there is just too much to concentrate on, too many variables, you have in effect too much control at your fingertips. Most people, want to take large numbers of photographs, so while with a plate camera in years gone by, you could and needed to consider so many factors to make sure each image came out and was worth the cost incurred, today we can just take loads of photos if we wish and some are sure to be good. For some people this achieves their objectives, while others of us want to make sure that nearly every picture is technically good and many have artistic merit. Developing to the point where consistently good results are the order of the day can be achieved by anyone. You can gain the facts and knowledge on how to take good photos from this website, and with some practice and your own experiments master this art form without difficulty. Attending colleges, correspondence courses and group sessions will offer you little benefit if any at all, while one to one tuition can cut the time it takes down to a day or two, gaining access to someone who has the skills and knowledge can be difficult, most offering the training having little more knowledge than you do. Photography is a practical skill, you learn it using a camera and looking at your results, experimenting, working out how you could have done better and trying again. The more you go out and take photos the more experience and better the results. To start with the temptation is to put the camera on automatic and let it do everything except press the button to take the image. However taking it out of automatic mode and making your own choices will after the first few mistakes, give far better results.
|
||||||
|
||||||
| . | ||||||
|
||||||
|
|